Let's Build This Puppy: Assembling The Cake
Here is the secret to assembling cake: Having a great base to work with.
You get a cake board that matches the size of your cake (from Sur la table for just ask your local bakery). Then you get one that is 2 inches larger than your cake. Cover with aluminum foil and tape the small one to the larger one. This means that you can stick your cake on the base and carry it around by the larger base without dinging it. You can also put it in a cake box the size of the larger round. The cake will not slide around the box. Perfect!

 You can peel off the larger round right before as shown below.

An offset spatula is essential in frosting.

A skewer through the middle allowed us to keep the layers in place.

You get a cake board that matches the size of your cake (from Sur la table for just ask your local bakery). Then you get one that is 2 inches larger than your cake. Cover with aluminum foil and tape the small one to the larger one. This means that you can stick your cake on the base and carry it around by the larger base without dinging it. You can also put it in a cake box the size of the larger round. The cake will not slide around the box. Perfect!

 You can peel off the larger round right before as shown below.
Your cake will be finger print free!
Back to the assembling. We left off with a cooled cakes...
TORTING
You can tort with a long serrated knife or fishing wire. Lisa did both here. Make sure to use a ruler at all times to ensure that your cut is even.
(I apologize for the sound/dialogue in the background. We were watching the documentary "Jesus Camp"
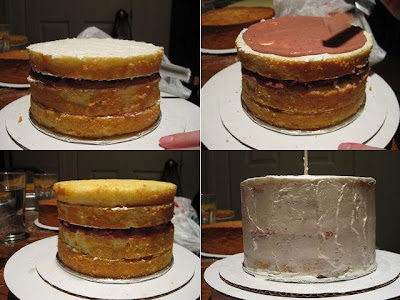
ASSEMBLE - GENESIS
I did four layers with butter cream and curd in the middle. The butter cream filling was as thin as possible. I used it to create a bilayer so that the curd would't completely soak into the cake and render it visually filling-less. Be careful though, these layers can slip on themselves if you move without time for the frosting to set.
I put raspberries between layers 2 and 3.

At every stage you want to methodically check the height around the cake so that ones side is not higher than the other. Compensate with frosting when things get a little lopsided. Shhh...Nobody will know...

An offset spatula is essential in frosting.


A skewer through the middle allowed us to keep the layers in place.


Comments
Post a Comment